First of all we need to Sign in into https://developers.facebook.com/ website .
After Sign in we need to select Create a New App option under Apps drop down menu as follows

After selecting Create a New App option we will get Create a New App window .
In this window we can see two input fields called Display Name and Name Space
we need to enter only our application name in Display Name field
and we can leave Name Space field empty.
Next choose Category that our application belongs to and then finally click Create App button to finish.
 Once select Create App button in next window we can see application dashboard as follows.
and in this dashboard only we can get our application id and App Secret

Next step is in this dashboard we need select Settings option from left side navigation bar as follows

Next we need to select +Add Platform option as follows

After selecting Add Platform option we will get Select Platform window there we need to select Android platform as follows.

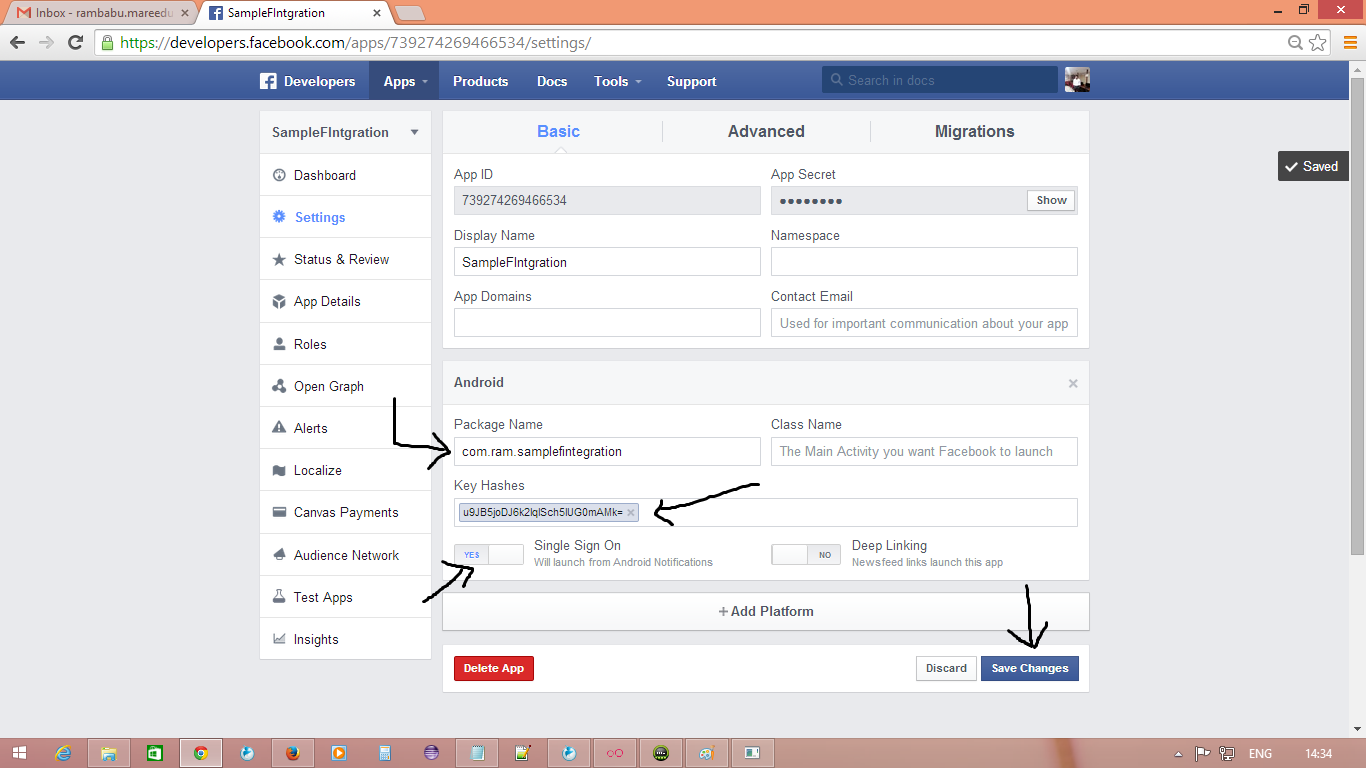
In the next window please provide the application package name and key hashes and select single sign on option and then finally select save changes button as shown in below
Note: to generate key hash for your application please read this post in my blog
http://ramsandroid4all.blogspot.in/2014/07/generating-facebook-key-hash.html
Next download android facebook sdk from here : https://developers.facebook.com/docs/android/downloads
after download we will get facebook sdk zip file just extract it.
Next import facebook sdk into Eclipse as follows
1.under package explorer right click and select import option.
2.next under android folder select Existing Projects into Workspace option.
3.Next select root directory option and browse facebook sdk folder.
4.once we browse android sdk folder it will show you number projects and can import them all
and you can run them as sample facebook projects or you can just select facebook sdk project and
hit finish button
Next we need to add facebook sdk library to our project to that follow below steps:
1.Right click on the our project and select properties option
2.In the next window select android
3.under library select add option next it will show you facebook sdk select it and select apply button
and select ok button . as shown in below

After Sign in we need to select Create a New App option under Apps drop down menu as follows
After selecting Create a New App option we will get Create a New App window .
In this window we can see two input fields called Display Name and Name Space
we need to enter only our application name in Display Name field
and we can leave Name Space field empty.
Next choose Category that our application belongs to and then finally click Create App button to finish.
and in this dashboard only we can get our application id and App Secret
Next step is in this dashboard we need select Settings option from left side navigation bar as follows
Next we need to select +Add Platform option as follows
After selecting Add Platform option we will get Select Platform window there we need to select Android platform as follows.
In the next window please provide the application package name and key hashes and select single sign on option and then finally select save changes button as shown in below
Note: to generate key hash for your application please read this post in my blog
http://ramsandroid4all.blogspot.in/2014/07/generating-facebook-key-hash.html
Next download android facebook sdk from here : https://developers.facebook.com/docs/android/downloads
after download we will get facebook sdk zip file just extract it.
Next import facebook sdk into Eclipse as follows
1.under package explorer right click and select import option.
2.next under android folder select Existing Projects into Workspace option.
3.Next select root directory option and browse facebook sdk folder.
4.once we browse android sdk folder it will show you number projects and can import them all
and you can run them as sample facebook projects or you can just select facebook sdk project and
hit finish button
Next we need to add facebook sdk library to our project to that follow below steps:
1.Right click on the our project and select properties option
2.In the next window select android
3.under library select add option next it will show you facebook sdk select it and select apply button
and select ok button . as shown in below


